Most consumer cameras allow you to experiment in various modes which are in built into the camera. I am referring to the small letters printed on your camera dial such as P (Program), AUTO, TV (Shutter Priority),AV( Aperture Priority)M (Manual) etc. Unless you plan to move on step ahead and are particular about the output that you wish to have, I suggest you stick to the Auto mode, which is the default mode in your camera. This mode takes care of most situations in everyday photography.
While it may seem rather obvious and simple, your way of holding the camera is very important in getting a steady photo of your subject. This is particularly important in low light situations such as night photography where chances of getting a blurred photo are on the higher side even with the slightest movement of the camera. Hold the camera close to your body with a firm grip. Hold your breath for a second while you click. Keep it steady, till you see the output/photo on your LCD screen. Always wear the camera strap unless it is absolutely necessary to hold the camera considerably away from your body.
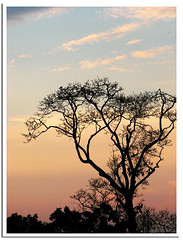 There are photographers who love to use the flash creatively and then there are these hard core ambient natural light lovers who use minimal flash that too if absolutely necessary. Since most consumer cameras come with smaller sensors, the ability to get quality pictures during night time without flash is less. Most small consumer cameras have a harsh flash which makes the photo look very artificial. Hence daylight would be the best time to try experimenting particularly with outdoor photography. In fact the best time would be early in the morning (7 am – 9:30-10 am) before the sun builds up that sweat on your forehead. It’s less about the sweat and more about the fact that light coming from the sun would not be harsh at that point of time. It would be bright enough to light up your subjects optimally. 3pm to 5pm would also be ideal for the same reason. Between 5: 30pm and 7pm, you will find quick changes happening in the skyline. Just before sunset you will see hues of blue and warm yellow tones getting changed to light and then dark orange. It’s a treat for your eyes and the best time to get Silhouette’s as shown in the picture here.
Composition is where most people screw up. It’s one of the most important aspects in photography. Composition simply refers to the placement of your subjects within the frame. Putting your subject bang in the middle of the frame is the drabbest thing you can do to your photo. Make it off centre and see the difference. For a slightly sophisticated explanation read the ' Rule of thirds '.
 In this photo to the left, you can see concept of rule of thirds being implemented.Since the focus/primary subject is the sea with the boat and fishing nets, these should occupy 2/3rds of your frame.
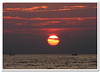
Similarly in the photo towards your right here, since the setting sun in the horizon is the main subject, it has occupied 2/3rds of the frame thereby giving it a more dramatic effect. Try not to split your images horizontally into two equal halves.
Always try to have a clear plain and simple background, avoid clutter and make your subject stand out. The viewer should not get confused about what the photographer is trying to capture. So always highlight your subject. You can diffuse clutter in the background by moving a bit away from your subject and zooming in appropriately thereby blurring the subject’s background.
That's it for now. I do not want to make the post any longer. Please feel free to write to me at manmadhanmidhun@gmail.com on any doubts/clarifications. Shall keep writing about this passion of mine.
While it may seem rather obvious and simple, your way of holding the camera is very important in getting a steady photo of your subject. This is particularly important in low light situations such as night photography where chances of getting a blurred photo are on the higher side even with the slightest movement of the camera. Hold the camera close to your body with a firm grip. Hold your breath for a second while you click. Keep it steady, till you see the output/photo on your LCD screen. Always wear the camera strap unless it is absolutely necessary to hold the camera considerably away from your body.
There are photographers who love to use the flash creatively and then there are these hard core ambient natural light lovers who use minimal flash that too if absolutely necessary. Since most consumer cameras come with smaller sensors, the ability to get quality pictures during night time without flash is less. Most small consumer cameras have a harsh flash which makes the photo look very artificial. Hence daylight would be the best time to try experimenting particularly with outdoor photography. In fact the best time would be early in the morning (7 am – 9:30-10 am) before the sun builds up that sweat on your forehead. It’s less about the sweat and more about the fact that light coming from the sun would not be harsh at that point of time. It would be bright enough to light up your subjects optimally. 3pm to 5pm would also be ideal for the same reason. Between 5: 30pm and 7pm, you will find quick changes happening in the skyline. Just before sunset you will see hues of blue and warm yellow tones getting changed to light and then dark orange. It’s a treat for your eyes and the best time to get Silhouette’s as shown in the picture here.Composition is where most people screw up. It’s one of the most important aspects in photography. Composition simply refers to the placement of your subjects within the frame. Putting your subject bang in the middle of the frame is the drabbest thing you can do to your photo. Make it off centre and see the difference. For a slightly sophisticated explanation read the ' Rule of thirds '.
In this photo to the left, you can see concept of rule of thirds being implemented.Since the focus/primary subject is the sea with the boat and fishing nets, these should occupy 2/3rds of your frame.Similarly in the photo towards your right here, since the setting sun in the horizon is the main subject, it has occupied 2/3rds of the frame thereby giving it a more dramatic effect. Try not to split your images horizontally into two equal halves.
Always try to have a clear plain and simple background, avoid clutter and make your subject stand out. The viewer should not get confused about what the photographer is trying to capture. So always highlight your subject. You can diffuse clutter in the background by moving a bit away from your subject and zooming in appropriately thereby blurring the subject’s background.
That's it for now. I do not want to make the post any longer. Please feel free to write to me at manmadhanmidhun@gmail.com on any doubts/clarifications. Shall keep writing about this passion of mine.
Intresting article.. very informative too..
ReplyDeleteLooking forward to hearing more photography tips from you.. :)